Various effects
In the previous article, we used a monochrome filter to make an image monochrome. In this article, I will introduce a few other filters that can be used to apply effects to the image. The basics are the same as in the previous article.
The effects introduced here are as follows;
- Edge Detection
- Color Inversion
- Blur
- Rainbow Color Transform
I’m explaining one by one.
Prerequisite
It is assumed that the following environment is already in place, so if you do not have it yet, please follow the links to prepare it.
- Processing must be installed.
–>If not yet: Install Processing (Windows version, Mac version, Linux version) - Version 0.0.4 or later of TeshFx must be installed.
→If you have not yet done so, install TeshFx.
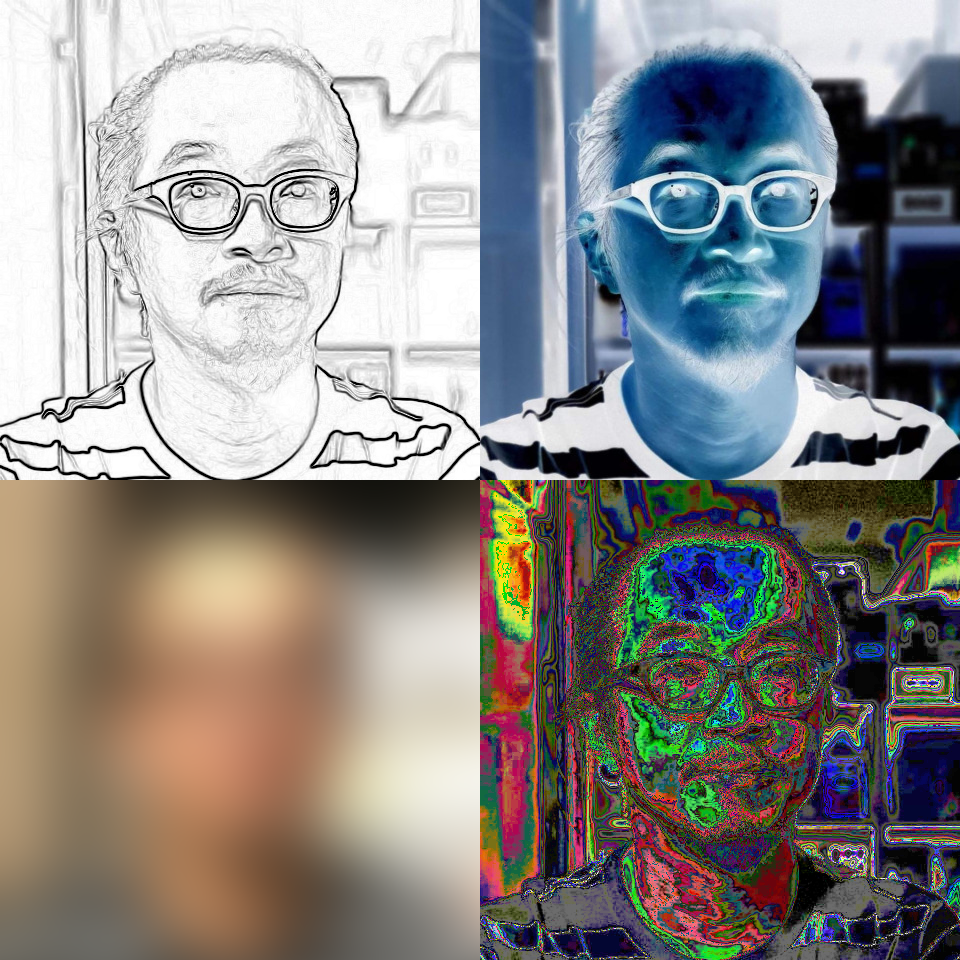
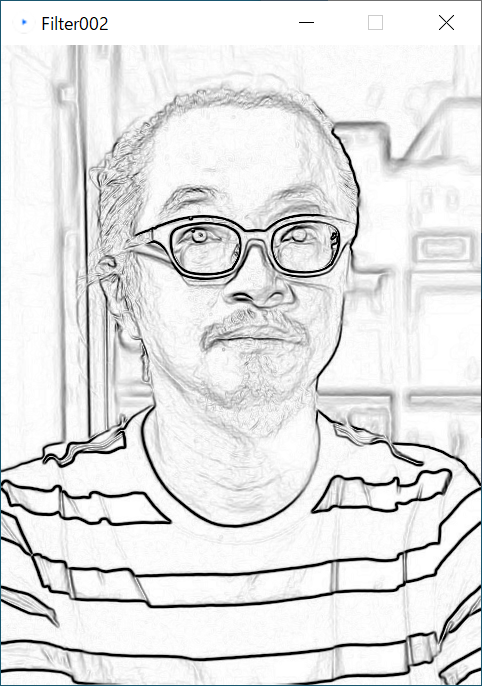
Edge Detection
Detects the “edges” of a given image and draws them. The picture becomes like a line drawing.
The code is as follows. Save this as “Filter002”.
PImage image; // // declare a variable "image"

import teshfx.filter.*; // declare to use TeshFxFilter

// Create a TeshFxEdgeFilter and assign it to the variable "edgeFilter"
TeshFxFilter edgeFilter = new TeshFxEdgeFilter();

void setup() {
  size(480, 640); // Specify window size as 480x640
  // Download the image specified by URL from the Internet and assign it to the variable "image".
  image = loadImage("https://coding4.art/wp-content/uploads/2022/11/teshnakamura.jpg");

  // Apply the filter to the image and reassign it to image.
  image = edgeFilter.filter(image);
}

void draw() {
  image(image, 0, 0); // display "image"
}

void dispose() {
  save("teshedged.png");
}
The only difference from the previous Filter001 is that the filter type is changed to TeshFxEdgeFilter in line 6 and the file name to be saved is changed in line 22. Thus, you can easily switch effects just by changing the filter.
When executed, it displays a handsome man who looks like a line drawing of the original image.
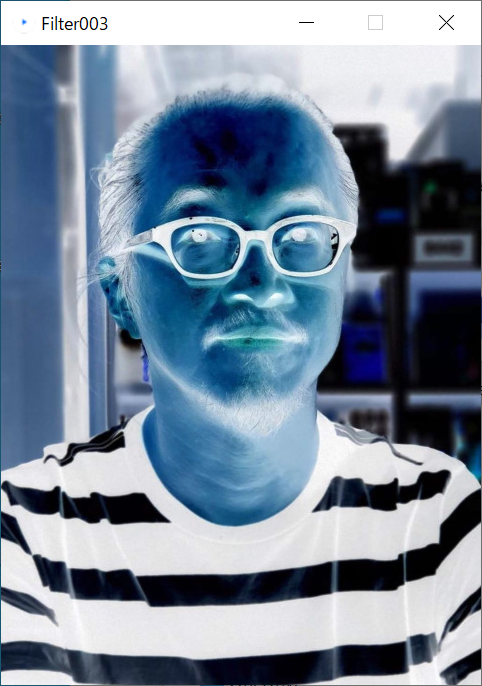
Color inversion
An effect that causes the original image to be converted to the opposite color. It is the same as a photographic negative.
The code is as follows. Save this as “Filter003”.
PImage image; // declare a variable "image"

import teshfx.filter.*; // declare to use TeshFxFilter

// Create a TeshFxInvertFilter and assign it to the variable "invertFilter"
TeshFxFilter invertFilter = new TeshFxInvertFilter();

void setup() {
  size(480, 640); // Specify window size as 480x640
  // Download the image specified by URL from the Internet and assign it to the variable "image".
  image = loadImage("https://coding4.art/wp-content/uploads/2022/11/teshnakamura.jpg");

  // Apply a filter to the image and reassign it to image.
  image = invertFilter.filter(image);
}

void draw() {
  image(image, 0, 0); // display "image"
}

void dispose() {
  save("teshinverted.png");  // save the image
}
Like the edge detection, this code only changes the filter type to TeshFxInvertFilter in line 6 of Filter001 and the file name to be saved in line 22.
When executed, the image appears as a negative of the original image.
Blur
An effect that blurs the original image.
The code is as follows. Save this as “Filter004”.
PImage image; // declare a variable "image"

import teshfx.filter.*; // declare to use TeshFxFilter

// Create a TeshFxBlurFilter and assign it to the variable "blurFilter"
TeshFxFilter blurFilter = new TeshFxBlurFilter();

void setup() {
  size(480, 640); // Specify window size as 480x640
  //Download the image specified by URL from the Internet and assign it to the variable "image".
  image = loadImage("https://coding4.art/wp-content/uploads/2022/11/teshnakamura.jpg");

  // Apply a filter to the image and reassign it to image.
  image = blurFilter.filter(image);
}

void draw() {
  image(image, 0, 0); // display "image"
}

void dispose() {
  save("teshblurred.png"); // save the image
}
For this code as well, the only changes are changing the filter type to TeshFxBlurFilter in line 6 of Filter001 and the file name to be saved in line 22.
When executed, the original image appears blurred.

Set parameters
Edge Detection and Color Inversion are simply the respective processes, but for Blur, the degree of blurring can be changed. To change this, set the parameters.
In the case of TeshFxBlurFilter, the blurring degree is specified by the “radius” parameter. In the previous example, we did not specify the radius value, but if you do not specify it, the default value is set to 10. The higher the value, the more blurred the image will be; if the value is 0, the original image will be left unchanged.
Now, the function to set the radius value that determines the degree of blurring is “radius(radius value)”.
When generating the filter, add a “.” (period) and call the function “radius” to set the value. function at the end.
The code is as follows.
PImage image; // declare a variable "image"

import teshfx.filter.*; // declare to use TeshFxFilter

// Create a TeshFxBlurFilter and assign it to the variable "blurFilter"
TeshFxFilter blurFilter = new TeshFxBlurFilter()
                                .radius(100)    // Set radius value to 100
                                .init();	// The last process when setting parameters

void setup() {
  size(480, 640); // Specify window size as 480x640
  //Download the image specified by URL from the Internet and assign it to the variable "image".
  image = loadImage("https://coding4.art/wp-content/uploads/2022/11/teshnakamura.jpg");

  // Apply a filter to the image and reassign it to image.
  image = blurFilter.filter(image);
}

void draw() {
  image(image, 0, 0); // display "image"
}

void dispose() {
  save("teshblurred.png"); // save the image
}
To make the code more readable, the filter is declared in three lines. This is a good way to write it, so keep it in mind.
Anyway, this code sets the radius value to 100 in line 7 and calls init in line 8.
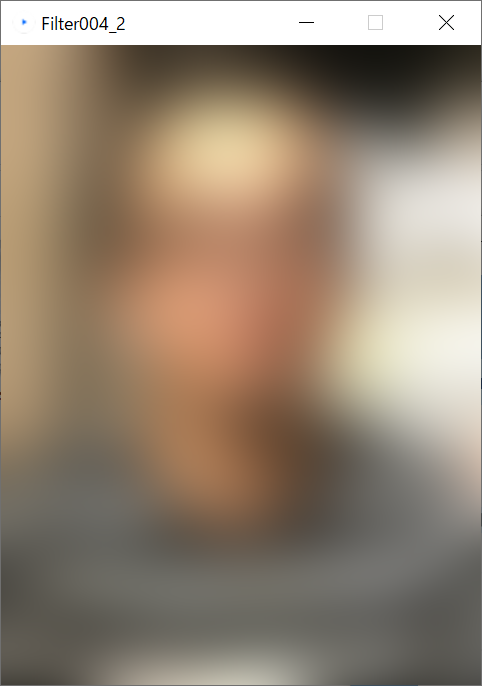
The larger the radius value, the longer it takes to process the image, so setting it to 100 will take a little longer, and then the image will be even blurrier than before, as shown below.
The above is how to write a filter when setting parameters.
This will be the basis for the future, so please learn how to do this.
Rainbow color conversion
Finally, let’s talk about the “Color Conversion” effect. The TeshFxRainbowColorFilter introduced here is a filter that converts the color of the original image to another color.
PImage image; // declare a variable "image"

import teshfx.filter.*; // declare to use TeshFxFilter

// Create a TeshFxRainbowColorFilter and assign it to the variable "rainbowColorFilter"
TeshFxFilter rainbowColorFilter = new TeshFxRainbowColorFilter();

void setup() {
  size(480, 640); // Specify window size as 480x640
  //Download the image specified by URL from the Internet and assign it to the variable "image".
  image = loadImage("https://coding4.art/wp-content/uploads/2022/11/teshnakamura.jpg");

  // Apply a filter to the image and reassign it to image.
  image = rainbowColorFilter.filter(image);
}

void draw() {
  image(image, 0, 0); // display "image"
}

void dispose() {
  save("teshraibowcolored.png"); // save the image
}
When this code is executed, the colors of the original image are transformed.

This code uses random numbers to determine the conversion rules. A random number is a function that yields a different value each time it is called, just like rolling dice, and is often used in games. The fact that a different value is obtained each time a random number is called means that this code will convert to different colors each time it is executed. Please try it out by executing several times.
If the parameter “seed” is set here, the same color conversion rules are executed. For example, the following settings will result in the same color conversion each time.
For example, set “seed” to 2022 as shown below. In this case, the “seed” value must have l (a lower-case letter of “L”) at the end.
PImage image; // declare a variable "image"

import teshfx.filter.*; // declare to use TeshFxFilter

// Create a TeshFxRainbowColorFilter and assign it to the variable "rainbowColorFilter"
TeshFxFilter rainbowColorFilter = new TeshFxRainbowColorFilter()
                                .seed(2022l)    // Set the seed value to 2022 (with a trailing "l" (lowercase el))
                                .init();	// Final processing when parameters are set

void setup() {
  size(480, 640); // Specify window size as 480x640
  //Download the image specified by URL from the Internet and assign it to the variable "image".
  image = loadImage("https://coding4.art/wp-content/uploads/2022/11/teshnakamura.jpg");

  // Apply a filter to the image and reassign it to image.
  image = rainbowColorFilter.filter(image);
}

void draw() {
  image(image, 0, 0); // display "image"
}

void dispose() {
  save("teshraibowcolored.png"); // save the image
}
No matter how many times this code is executed, the same color transformation is performed each time.
Also, if you got the seed of the conversion when the first seed is not set, you will be able to reproduce it. To do so, call the function “params”. The seed value is then displayed in the lower part of the sketch window (this part is called “console”).
PImage image; // declare a variable "image"

import teshfx.filter.*; // declare to use TeshFxFilter

// Create a TeshFxRainbowColorFilter and assign it to the variable "rainbowColorFilter"
TeshFxFilter rainbowColorFilter = new TeshFxRainbowColorFilter();

void setup() {
  rainbowColorFilter.params(); // show parameters
  size(480, 640); // Specify window size as 480x640
  //Download the image specified by URL from the Internet and assign it to the variable "image".
  image = loadImage("https://coding4.art/wp-content/uploads/2022/11/teshnakamura.jpg");

  // Apply a filter to the image and reassign it to image.
  image = rainbowColorFilter.filter(image);
}

void draw() {
  image(image, 0, 0); // display "image"
}

void dispose() {
  save("teshraibowcolored.png"); // save the image
}
Line 6 generates TeshFxRainbowColorFilter without setting the seed value, and line 9 displays the seed value.
If you set the seed value that you got by param function, the color transformation rule obtained by chance can be reproduced.
Summary
The following effects were described in this issue.
- Edge Detection
- Color Inversion
- Blur
- Rainbow Color Transform
Of these, “Edge Detection” and “Color Inversion” perform predetermined effects, while “Blur” and “Rainbow Color Conversion” allow the user to change the conversion by setting parameters.